I made Reese’s Stuffed Rice Krispie Treats that tuck a whole peanut butter cup into every square, and the simple secret had everyone asking how I did it.
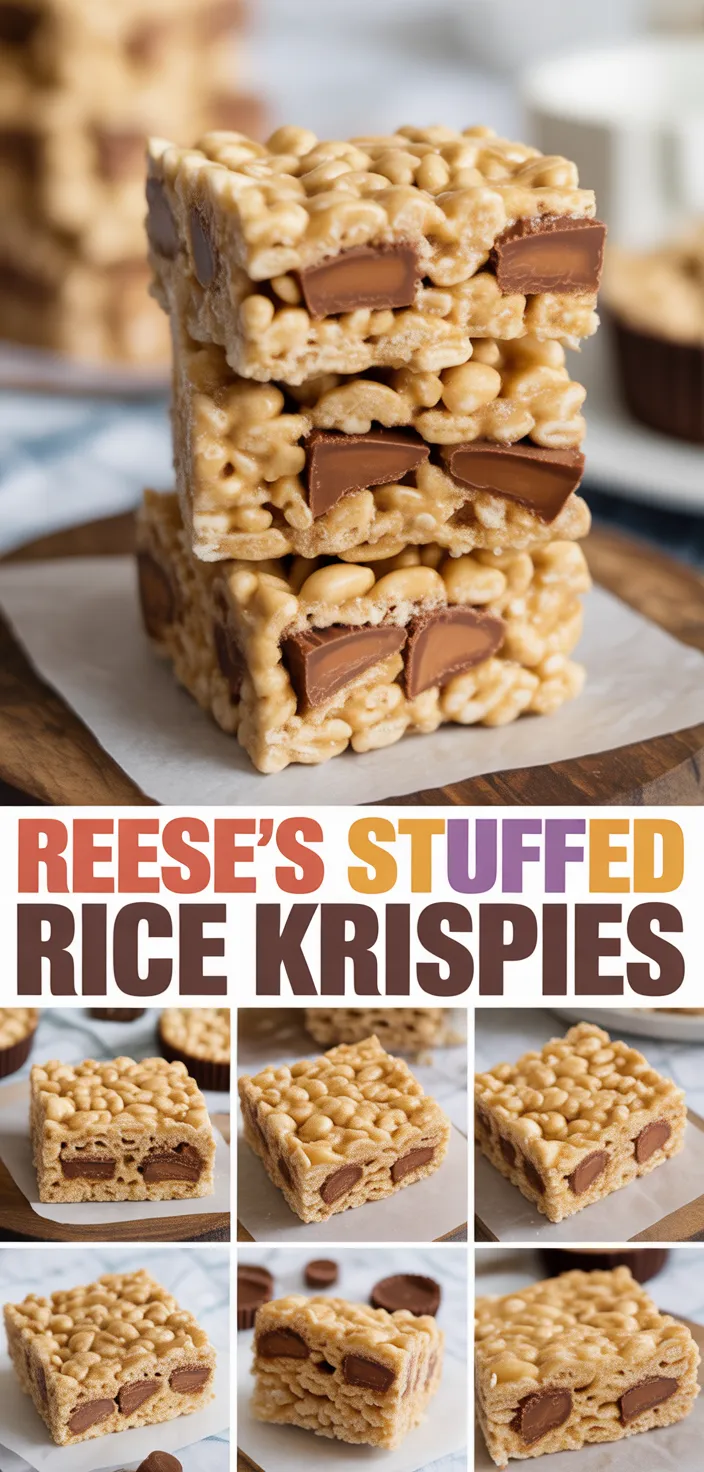
I swear I did not mean to create a cult favorite, but People Will Lose Their Minds Over my Reese’s Stuffed Rice Krispie Treats. I stuffed gooey mini marshmallows around mini REESE’S Peanut Butter Cups so every bite is a weird little explosion of sticky, salty, chocolaty joy.
I cant explain why it hits different, maybe the surprise center, maybe the nostalgia turned naughty, but everyone who tries one just stares like they forgot what normal snacks are. If you like dumbly good desserts that make people argue over the last piece, this one will ruin you in the best way.
Ingredients
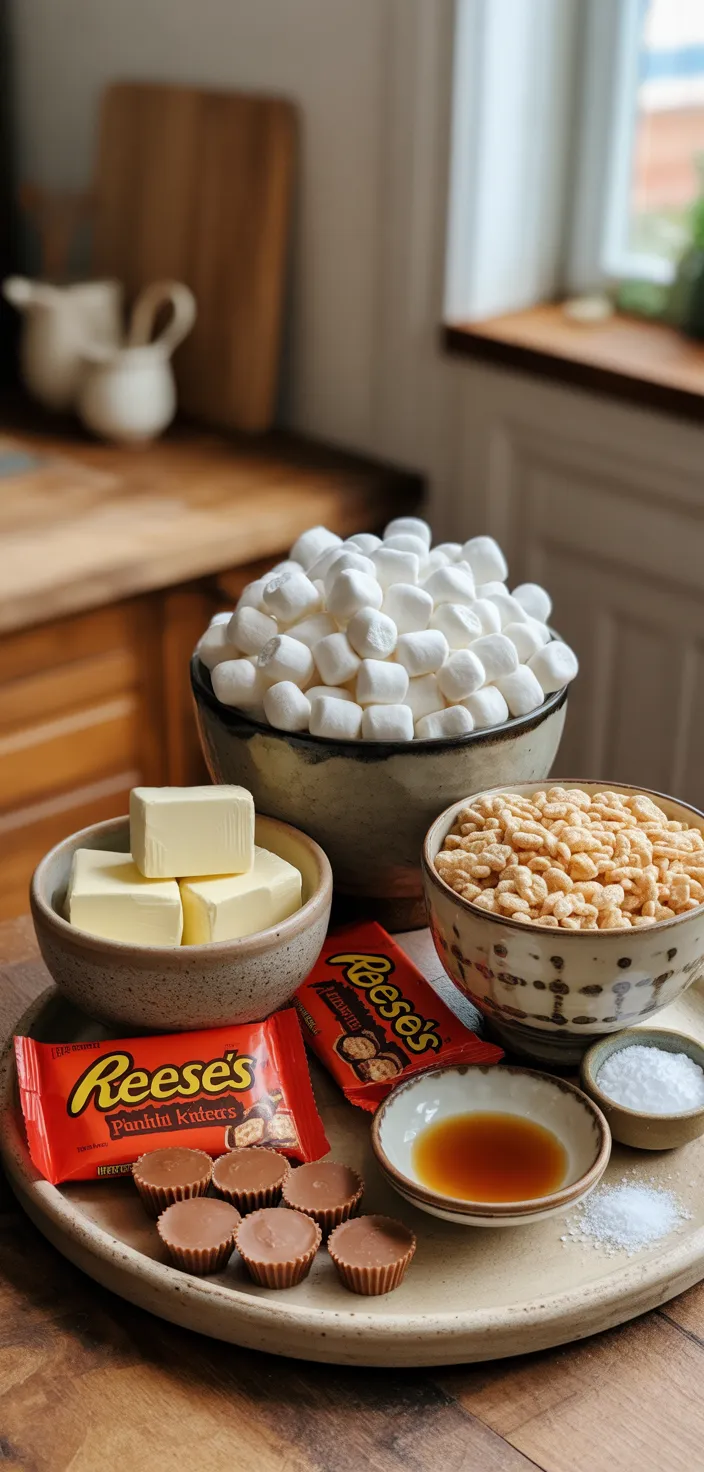
- Unsalted butter: Rich fat that helps melt marshmallows, adds flavor and calories, not much in nutrients.
- Mini marshmallows: Primary sweetener, mostly sugar, gives gooey texture and carbs, almost zero protein.
- Rice Krispies cereal: Light crisp cereal mostly carbs and little fiber gives crunch and keeps treats together.
- Mini REESE’S Peanut Butter Cups: Sweet and salty, give peanut butter protein but mostly sugar and fat, addictive.
- Vanilla extract: Tiny splash boosts flavor, adds aroma and sweetness, no real nutrition but it’s worth it.
- Pinch of salt: Balances sweetness and enhances flavors, small sodium boost but necessary, don’t overdo it.
Ingredient Quantities
- 4 tablespoons unsalted butter, plus a little extra for greasing the pan
- 1 (10-ounce) bag mini marshmallows, cuz you want it super gooey
- 6 cups Rice Krispies cereal
- 24 mini REESE’S Peanut Butter Cups, unwrapped (or about 12 regular REESE’S cups cut in half)
- 1 teaspoon vanilla extract, optional but really nice
- Pinch of salt
How to Make this
1. Unwrap the 24 mini REESE’S (or cut 12 regular ones in half) and pop them in the freezer for 10 to 15 minutes so they dont melt when you press the bars together.
2. Butter a 9×13 inch pan lightly with a bit of the extra butter, or line it with parchment and butter the paper so stuff wont stick.
3. In a large pot melt the 4 tablespoons unsalted butter over low heat, then add the whole 10 ounce bag of mini marshmallows and stir constantly until totally melted and smooth.
4. Stir in 1 teaspoon vanilla extract and a pinch of salt, turn off the heat right away so the marshmallows dont scorch.
5. Dump in the 6 cups Rice Krispies cereal and fold gently but quickly until every flake is coated, dont overmix or it gets tough.
6. Press about half the cereal mixture into the prepared pan using a buttered spatula or a piece of buttered wax paper, make an even layer but dont pack it too hard.
7. Take the chilled REESE’S from the freezer and arrange them in a close grid on top of that first layer, leave a little space at the edges so you can seal them in.
8. Spoon the remaining cereal mixture over the candies and press gently to cover, use buttered hands or wax paper to press down so the peanut butter cups dont squish out.
9. Let the whole pan cool and set at room temp for at least 30 minutes, then cut into squares and store airtight for up to 2 days, or longer in the fridge if you like them firmer.
Equipment Needed
1. 9 by 13 inch baking pan, parchment paper or buttered so stuff wont stick
2. Large heavy bottomed pot for melting the butter and marshmallows
3. Heatproof rubber spatula or wooden spoon for stirring and folding
4. Measuring cups and measuring spoons (youll need tablespoons and 1 teaspoon)
5. Buttered spatula or a piece of buttered wax paper to press the cereal down
6. Freezer safe plate or small baking sheet to chill the unwrapped REESE’S
7. Sharp knife and cutting board if you need to cut regular REESE’S in half
8. Airtight container or plastic wrap for storing the bars once theyre cut
FAQ
People Will Lose Their Minds Over REESE’S STUFFED Rice Krispies Treats Recipe Substitutions and Variations
- Unsalted butter: swap with equal parts salted butter (then cut back on any added salt), or use coconut oil 1:1 for a dairy free twist though it will set a bit softer, or use margarine/vegetable shortening for a firmer bar.
- Mini marshmallows: if you only have big marshmallows use about 3 1/2 to 4 cups chopped, or use one 7 oz jar marshmallow creme warmed with the butter until smooth (chewier texture).
- Rice Krispies cereal: any puffed rice cereal works, try puffed brown rice or a gluten free puffed rice. For a flavor swap mix half with Cocoa Krispies or crushed graham crackers for extra crunch and flavor.
- Mini REESE’S Peanut Butter Cups: use chopped regular REESE’S cups, peanut butter chips, or drop small chilled dollops of peanut butter (mixed with a little powdered sugar) and press a chocolate chip on top.
Pro Tips
– Warm your spatula or knife first, it makes pressing and cutting way easier. Run a metal spatula or a sharp serrated knife under hot water, dry it quick and use it to press the top layer or slice the bars. The heat helps smooth things without squishing the peanut butter cups, youll get neater squares.
– Chill at the right time, not too long or too short. Let the pan sit at room temp till mostly set, then stick it in the fridge for 10 to 20 minutes if you want firmer bars and cleaner cuts. If you freeze them, only do a quick 10 minute blast or the marshmallow gets rock-hard and cracks when you cut.
– Add a little contrast for grown-up flavor. A tiny sprinkle of flaky sea salt on top before it sets, or a quick 1 minute toast of the cereal in a dry pan for a nuttier note, makes these less one-note sweet. Just dont overtoast the cereal, it burns fast.
– Keep sticky hands and mess to a minimum by using a small squirt of neutral oil or a dab of nonstick spray on your palms or wax paper when pressing. Also store bars layered with parchment so they dont smoosh together, and they last longer in the fridge if you like them firmer.
People Will Lose Their Minds Over REESE'S STUFFED Rice Krispies Treats Recipe
I made Reese's Stuffed Rice Krispie Treats that tuck a whole peanut butter cup into every square, and the simple secret had everyone asking how I did it.
12
servings
258
kcal
Equipment: 1. 9 by 13 inch baking pan, parchment paper or buttered so stuff wont stick
2. Large heavy bottomed pot for melting the butter and marshmallows
3. Heatproof rubber spatula or wooden spoon for stirring and folding
4. Measuring cups and measuring spoons (youll need tablespoons and 1 teaspoon)
5. Buttered spatula or a piece of buttered wax paper to press the cereal down
6. Freezer safe plate or small baking sheet to chill the unwrapped REESE’S
7. Sharp knife and cutting board if you need to cut regular REESE’S in half
8. Airtight container or plastic wrap for storing the bars once theyre cut
Ingredients
4 tablespoons unsalted butter, plus a little extra for greasing the pan
1 (10-ounce) bag mini marshmallows, cuz you want it super gooey
6 cups Rice Krispies cereal
24 mini REESE'S Peanut Butter Cups, unwrapped (or about 12 regular REESE'S cups cut in half)
1 teaspoon vanilla extract, optional but really nice
Pinch of salt
Directions
- Unwrap the 24 mini REESE'S (or cut 12 regular ones in half) and pop them in the freezer for 10 to 15 minutes so they dont melt when you press the bars together.
- Butter a 9×13 inch pan lightly with a bit of the extra butter, or line it with parchment and butter the paper so stuff wont stick.
- In a large pot melt the 4 tablespoons unsalted butter over low heat, then add the whole 10 ounce bag of mini marshmallows and stir constantly until totally melted and smooth.
- Stir in 1 teaspoon vanilla extract and a pinch of salt, turn off the heat right away so the marshmallows dont scorch.
- Dump in the 6 cups Rice Krispies cereal and fold gently but quickly until every flake is coated, dont overmix or it gets tough.
- Press about half the cereal mixture into the prepared pan using a buttered spatula or a piece of buttered wax paper, make an even layer but dont pack it too hard.
- Take the chilled REESE'S from the freezer and arrange them in a close grid on top of that first layer, leave a little space at the edges so you can seal them in.
- Spoon the remaining cereal mixture over the candies and press gently to cover, use buttered hands or wax paper to press down so the peanut butter cups dont squish out.
- Let the whole pan cool and set at room temp for at least 30 minutes, then cut into squares and store airtight for up to 2 days, or longer in the fridge if you like them firmer.
Notes
- Below you’ll find my best estimate of this recipe’s nutrition facts. Treat the numbers as a guide rather than a rule—great food should nourish both body and spirit. Figures are approximate, and the website owner assumes no liability for any inaccuracies in this recipe.
Nutrition Facts
- Serving Size: 60g
- Total number of serves: 12
- Calories: 258kcal
- Fat: 9.2g
- Saturated Fat: 4.8g
- Trans Fat: 0.04g
- Polyunsaturated: 0.5g
- Monounsaturated: 2.1g
- Cholesterol: 15mg
- Sodium: 158mg
- Potassium: 66mg
- Carbohydrates: 40g
- Fiber: 0.9g
- Sugar: 24g
- Protein: 2.9g
- Vitamin A: 106IU
- Vitamin C: 0mg
- Calcium: 28mg
- Iron: 1.3mg