I made adorable bunny butt Oreo pops called Bunny Oreo Balls, and a tiny candy tail is the playful detail that makes them ideal for Easter parties.
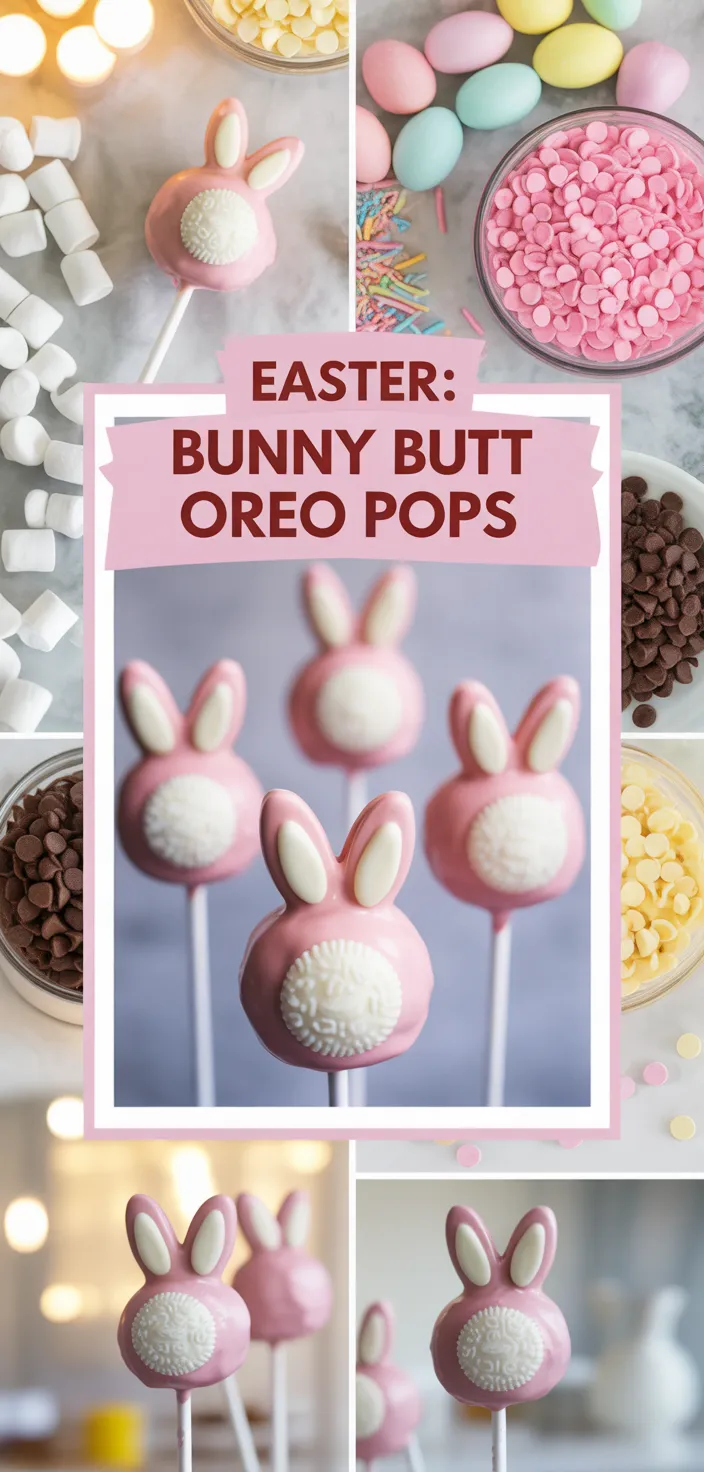
I’m obsessed with these Bunny Butt Oreo Pops. With Easter right around the corner I wanted something silly, quick and totally Instagramable.
Imagine Oreo rounds cloaked in white candy melts with a tiny puff of mini marshmallows for a tail, each one basically begging to be photographed. They’re playful, a little ridiculous, and perfect when you want Cute Bunny Desserts but without turning your kitchen into a wreck.
If you’ve made Bunny Oreo Balls before, this feels like the same joy but cuter somehow. I promise they’ll be the first things to disappear at any party, and you’ll wanna make more.
Ingredients
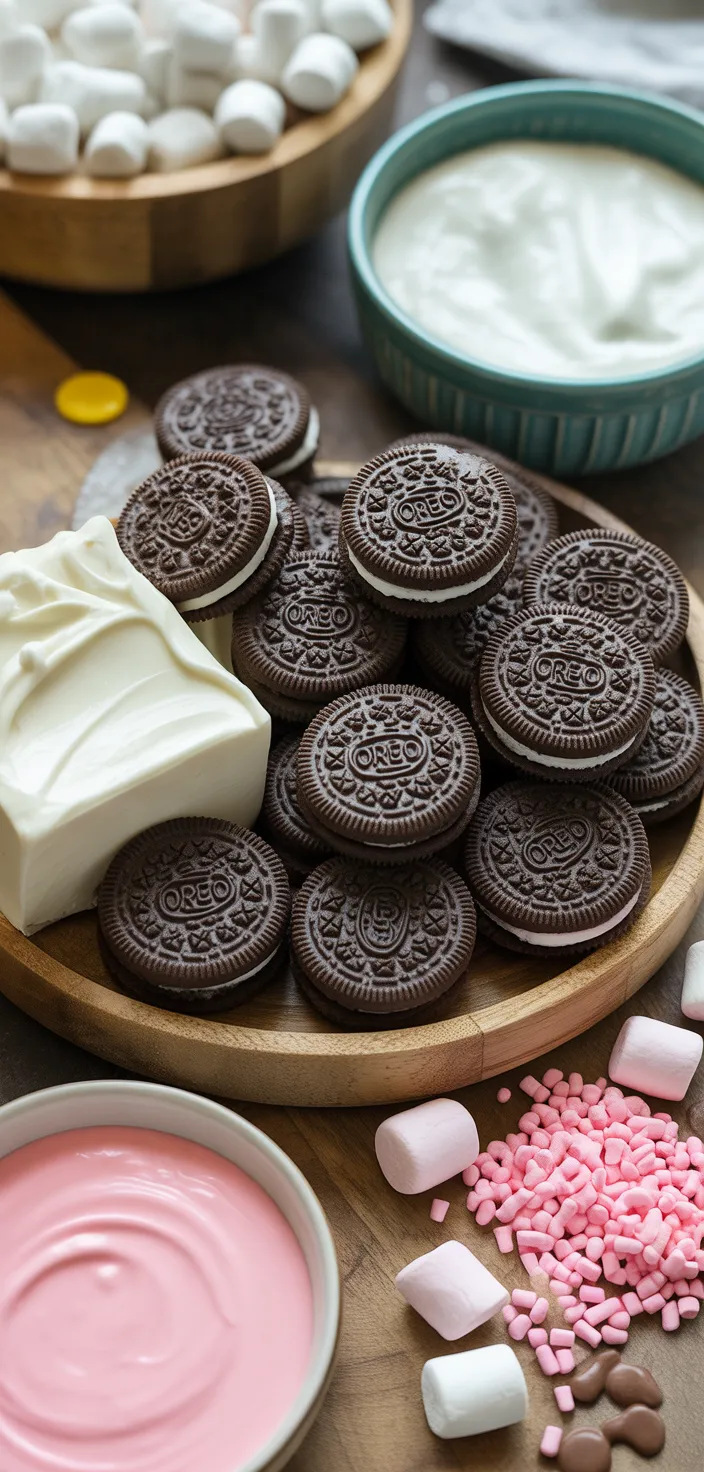
- Crushed Oreos add a crunchy chocolatey base, mostly carbs and sugar, kids love em.
- Cream cheese makes creamy filling, it’s got protein and fat, not low calorie.
- White candy melts coat pops sweetly, lots of sugar, gives a smooth glossy finish.
- Vegetable oil thins the coating for dipping, adds fat not flavor, use sparingly.
- Pink candy melts make tails and feet cute, adds color and extra sweetness.
- Mini marshmallows are fluffy tails, mostly sugar and air, kids always want more.
- Tiny sprinkles or chocolate add personality, little carbs and sugar, a fun touch.
Ingredient Quantities
- 24 Oreo sandwich cookies (regular or Double Stuf, use Double Stuf if you want extra cream)
- 8 oz (225 g) cream cheese, softened to room temp
- 12 oz (340 g) white candy melts or white chocolate chips
- 1 to 2 tablespoons vegetable oil or coconut oil to thin the coating if needed
- 24 lollipop sticks or cake pop sticks
- 4 oz (about 1/2 cup) pink candy melts or pink melting chocolate for tails and feet detail
- 24 mini marshmallows for fluffy bunny tails
- 2 tablespoons small pink sprinkles or tiny heart sprinkles for feet and cheeks
- Small amount brown or black candy melts or an edible marker for tiny nose or paw details
How to Make this
1. Crush 24 Oreo cookies in a zip bag with a rolling pin until fine crumbs, pour into a bowl and mix with 8 oz softened cream cheese until evenly combined, use Double Stuf if you want extra cream, it makes them richer.
2. Scoop the mixture into 24 even portions (a tablespoon or small cookie scoop works), roll into balls and place on a parchment lined tray; chill in the fridge 10 to 15 minutes so they firm up a bit.
3. Warm 12 oz white candy melts or white chocolate chips in a microwave safe bowl in 20 to 30 second bursts, stirring between, add 1 to 2 tablespoons vegetable oil only if you need to thin the coating so it’s smooth and runny enough to coat.
4. Dip the tip of each lollipop stick into the white coating then insert into the center of each chilled ball, this helps the stick stay put; return to chill 5 minutes so the “glue” sets.
5. Hold a pop by the stick and dip fully into the white coating, tap gently to remove excess and rotate to get an even coat, stand upright in a foam block or a cup to set, repeat until all are coated.
6. Melt 4 oz pink candy melts and make two little oval foot shapes on parchment by piping or spooning small blobs, let them set a bit; use some of the pink melts as “glue” to attach a mini marshmallow tail to the back of each pop (you have 24 marshmallows), press tail on and let set.
7. When the pink feet are firm, attach them to the front bottom of each pop with a dab of pink melt, press 2 tablespoons small pink sprinkles or tiny heart sprinkles onto the feet for paw pads and use a couple more for cheeks if you want, they stick better while the melt is still tacky.
8. Use a very small amount of melted brown or black candy melts, or an edible marker, to dot tiny noses or paw details, keep the dots small and let everything fully harden before handling.
9. Store the pops upright in an airtight container in the fridge for up to 3 to 4 days, if coating gets cloudy or firm you can rewarm gently, and if any pop cracks just re-dip quickly and re-decorate.
Equipment Needed
1. Large zip-top bag (gallon) for crushing the Oreos
2. Rolling pin — or a heavy bottle works fine if you dont have one
3. Medium mixing bowl
4. Rubber spatula or wooden spoon for mixing and scraping
5. Tablespoon or small cookie scoop to portion the balls evenly
6. Baking tray lined with parchment paper
7. Microwave-safe bowl and a small heatproof spatula for melting chocolate
8. Lollipop or cake pop sticks plus a foam block or cup to stand them upright while they set
9. Piping bag or small spoon and a couple toothpicks for piping pink feet, attaching tails, and tiny details
FAQ
Easter: Bunny Butt Oreo Pops Recipe Substitutions and Variations
- Cream cheese 8 oz: Swap with equal weight mascarpone for a richer, silkier filling. If you really cant find either, try 1/2 cup softened unsalted butter plus 1/4 cup powdered sugar to bind the crumbs, but chill the balls first because that mix is softer and sweeter.
- White candy melts: Use white chocolate chips or chopped white couverture chocolate, or almond bark/vanilla candy coating. If the chocolate is too thick, stir in 1 teaspoon vegetable oil or coconut oil while melting to thin it out and make dipping smoother.
- Pink candy melts for tails and feet: Tint melted white chocolate with oil based or powdered food color, or pipe pink royal icing instead. Important tip dont use water based liquid color with chocolate or it will seize up.
- Mini marshmallows for tails: Substitute a small piped buttercream dot, a tiny white gumdrop, or a mini meringue for a fluffier or crunchier tail depending on what you like.
Pro Tips
– Chill smart, not forever. Pop the rolled balls on a tray into the freezer for about 8 to 12 minutes so they get firm but not rock hard. If theyre frozen solid they often crack when you dip, so only quick firming, then work fast.
– Melt slowly and thin carefully. Use short bursts in the microwave and stir a lot, or better yet melt white chocolate chips over a double boiler. Add oil 1/2 teaspoon at a time till you get a smooth, runny coating, dont dump in a tablespoon and hope for the best.
– Seat the stick like a pro. Press a tiny thumb-sized indent in each ball first, dip the stick tip in coating, then insert halfway and chill to set. That little well keeps the stick from wobbling or popping out while you dip.
– Prep decorations ahead and work warm. Pipe the pink feet and let them set on parchment, but keep a little melted pink in a warm bowl for gluing marshmallow tails and sprinkles so they stick. For tiny nose or paw dots use a toothpick or edible marker for control, its way easier than trying to pipe micro dots.
Easter: Bunny Butt Oreo Pops Recipe
I made adorable bunny butt Oreo pops called Bunny Oreo Balls, and a tiny candy tail is the playful detail that makes them ideal for Easter parties.
24
servings
191
kcal
Equipment: 1. Large zip-top bag (gallon) for crushing the Oreos
2. Rolling pin — or a heavy bottle works fine if you dont have one
3. Medium mixing bowl
4. Rubber spatula or wooden spoon for mixing and scraping
5. Tablespoon or small cookie scoop to portion the balls evenly
6. Baking tray lined with parchment paper
7. Microwave-safe bowl and a small heatproof spatula for melting chocolate
8. Lollipop or cake pop sticks plus a foam block or cup to stand them upright while they set
9. Piping bag or small spoon and a couple toothpicks for piping pink feet, attaching tails, and tiny details
Ingredients
24 Oreo sandwich cookies (regular or Double Stuf, use Double Stuf if you want extra cream)
8 oz (225 g) cream cheese, softened to room temp
12 oz (340 g) white candy melts or white chocolate chips
1 to 2 tablespoons vegetable oil or coconut oil to thin the coating if needed
24 lollipop sticks or cake pop sticks
4 oz (about 1/2 cup) pink candy melts or pink melting chocolate for tails and feet detail
24 mini marshmallows for fluffy bunny tails
2 tablespoons small pink sprinkles or tiny heart sprinkles for feet and cheeks
Small amount brown or black candy melts or an edible marker for tiny nose or paw details
Directions
- Crush 24 Oreo cookies in a zip bag with a rolling pin until fine crumbs, pour into a bowl and mix with 8 oz softened cream cheese until evenly combined, use Double Stuf if you want extra cream, it makes them richer.
- Scoop the mixture into 24 even portions (a tablespoon or small cookie scoop works), roll into balls and place on a parchment lined tray; chill in the fridge 10 to 15 minutes so they firm up a bit.
- Warm 12 oz white candy melts or white chocolate chips in a microwave safe bowl in 20 to 30 second bursts, stirring between, add 1 to 2 tablespoons vegetable oil only if you need to thin the coating so it’s smooth and runny enough to coat.
- Dip the tip of each lollipop stick into the white coating then insert into the center of each chilled ball, this helps the stick stay put; return to chill 5 minutes so the “glue” sets.
- Hold a pop by the stick and dip fully into the white coating, tap gently to remove excess and rotate to get an even coat, stand upright in a foam block or a cup to set, repeat until all are coated.
- Melt 4 oz pink candy melts and make two little oval foot shapes on parchment by piping or spooning small blobs, let them set a bit; use some of the pink melts as “glue” to attach a mini marshmallow tail to the back of each pop (you have 24 marshmallows), press tail on and let set.
- When the pink feet are firm, attach them to the front bottom of each pop with a dab of pink melt, press 2 tablespoons small pink sprinkles or tiny heart sprinkles onto the feet for paw pads and use a couple more for cheeks if you want, they stick better while the melt is still tacky.
- Use a very small amount of melted brown or black candy melts, or an edible marker, to dot tiny noses or paw details, keep the dots small and let everything fully harden before handling.
- Store the pops upright in an airtight container in the fridge for up to 3 to 4 days, if coating gets cloudy or firm you can rewarm gently, and if any pop cracks just re-dip quickly and re-decorate.
Notes
- Below you’ll find my best estimate of this recipe’s nutrition facts. Treat the numbers as a guide rather than a rule—great food should nourish both body and spirit. Figures are approximate, and the website owner assumes no liability for any inaccuracies in this recipe.
Nutrition Facts
- Serving Size: 42g
- Total number of serves: 24
- Calories: 191kcal
- Fat: 11.7g
- Saturated Fat: 5.9g
- Trans Fat: 0.02g
- Polyunsaturated: 1.25g
- Monounsaturated: 4.58g
- Cholesterol: 12mg
- Sodium: 84mg
- Potassium: 29mg
- Carbohydrates: 21.6g
- Fiber: 0.3g
- Sugar: 17.4g
- Protein: 0.8g
- Vitamin A: 175IU
- Vitamin C: 0mg
- Calcium: 19mg
- Iron: 0.25mg